Get started
Zero to paged in minutes.
Sign up, tell Pingtower what to watch, and choose who hears about it. Most people start on the web or in the iPhone app, with no code at all. Developers can wire it in with curl or an AI agent, or run the whole thing on their own server.
- Free during preview
- No credit card
- First alert in about five minutes
1.0Five ways in
Pick the way that fits you.
Two need no code at all. Three are for developers. They all end at the same place: an alert that finds a human.
- The web appAdd checks, write rules in plain words and invite your team, all in the browser.No code →
- The iPhone appSign up in the app and it becomes your pager. One swipe acknowledges an alert.No code →
- curl and the APICreate an account and a source, then POST your logs. Every step is one request.Developers →
- Your AI agentPaste one line into your coding agent and it sets up and tests the whole thing.Developers →
- Self-hostOne signed binary on your own box, on PostgreSQL or SQLite. Your data stays with you.Your server →
2.0No code
Start on the web. No developer needed.
Everything here works in the iPhone app too.
Open the web app →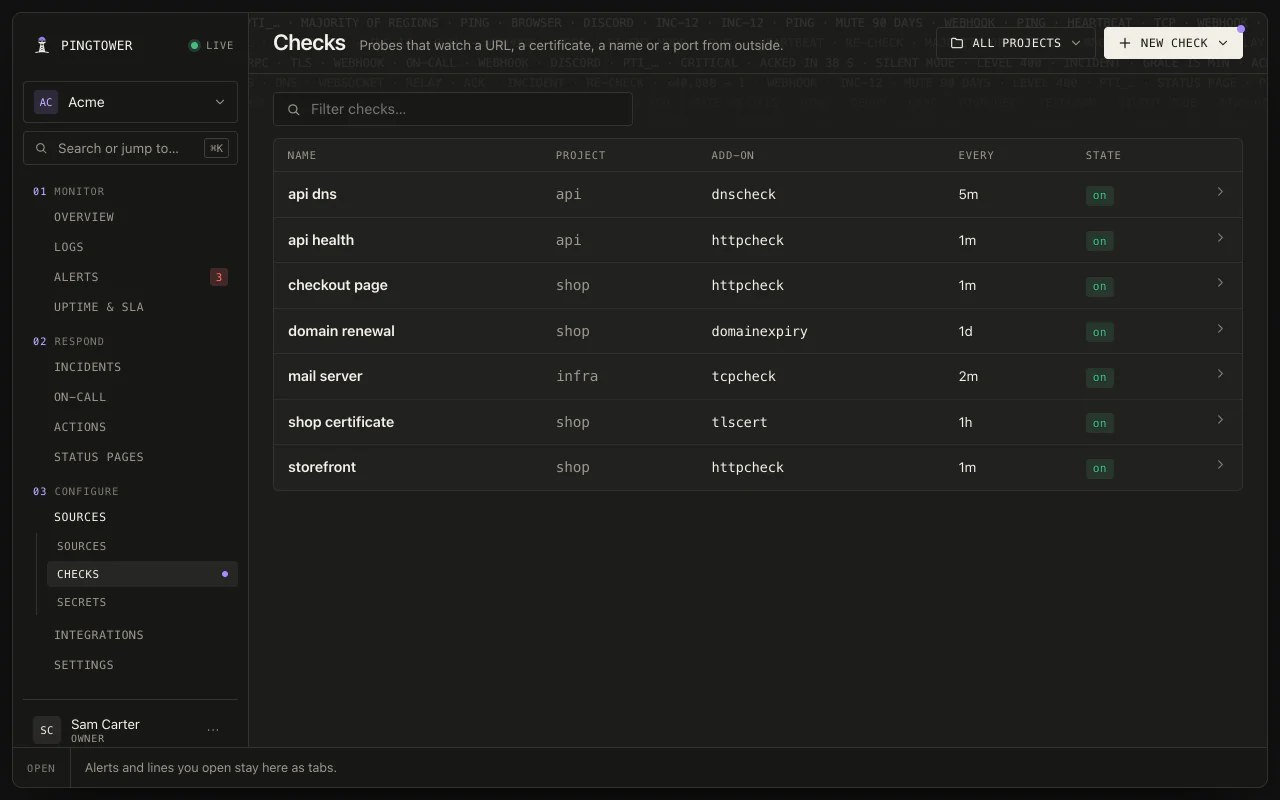
Your checks, in the web app
Paste an address and it's watched from Pingtower's own servers — nothing to install.
Step 1
Sign up
On the web or in the iPhone app. Free during preview, and no card.
Step 2
Add a check
Paste your website's address. Pingtower checks it from its own servers in multiple regions of the world, so there's nothing to install. Certificates, domains, servers and ports work the same way, and a browser check can walk through your checkout.
Step 3
Choose who hears about it
Your phone, a teammate's, Slack, Telegram or Discord, with a plain rule for when: "if checkout fails, ring Sam, then the agency after 10 minutes".
3.0iPhone
Your pager, in your pocket.
Push alerts that sound through Silent mode when it matters, one swipe to acknowledge, and the live logs behind every alert. Sign up in the app and you're pageable.
About the apps →
Scan with your iPhone camera
Opens the public TestFlight beta. It's open to everyone, no invite needed. iOS 17 or later, free.

A page that gets through
- Critical alerts through Silent mode and Focus, a permission you grant once
- One swipe stops the escalation ladder
4.0From the terminal
Wire it in with curl.
The hosted service runs the server for you: no upgrades to schedule, and the push pipeline to your phone is ours end to end. It's free while Pingtower is in preview, and the pricing page spells out the free tier.
curl -s https://api.pingtower.com/v1/signup \
  -H 'Content-Type: application/json' \
  -d '{"email":"[email protected]","password":"…"}'
# → {"account":{…},"token":"pts_…"}

curl -s https://api.pingtower.com/v1/tenants \
  -H "Authorization: Bearer pts_…" \
  -H 'Content-Type: application/json' \
  -d '{"name":"Acme"}'
# → {"id":"<tid>","name":"Acme","role":"owner"}

curl -s -X POST https://api.pingtower.com/v1/tenants/<tid>/keys \
  -H "Authorization: Bearer pts_…"
# → {"id":"…","token":"ptk_…"}   # shown once — store it
From there create a project, a source (its pti_ ingest
token is what your apps POST with), and a rule. The
API reference covers the whole data plane.
5.0AI agent
Or let your agent do it.
Paste this into Claude Code, Cursor or any coding agent. The guide it follows is written so an agent can run the install, the bootstrap, the wiring and a test alert end to end, then hand you the keys.
Set up Pingtower alerting for this project. Follow https://www.pingtower.com/agents/ end to end.6.0Self-host
Run it on your own server.
Prefer your alert data on your own box? Point the server at PostgreSQL, or let it keep SQLite files in its data directory with nothing else to install. Your rules and escalations work the same, and your phone can still ring through the relay.
Download a signed release
The server is a single static Go binary with no runtime and no
dependencies, and it does the whole inbound half locally. Every release carries an SSH signature
(ssh-keygen -Y, stock OpenSSH 8.2+) over a signed
provenance file naming exactly what was built; the signing key lives on
a hardware token and cannot be extracted from it. The table lists the
SHA-256 of each binary and of its signature.
| Artifact | Version | Size | SHA-256 |
|---|---|---|---|
| pingtower-linux-amd64 | api-1.1.0 | 38.7 MB | e0b46c0492d2a536d2e7249641320008d42e325821d458b961ae908f4c69d6d1 |
| pingtower-linux-amd64.release + .sig | 8bce9211361adf320c2e4a5063d6d8f258e988544666b8d996c016744f959805 | ||
| pingtower-linux-arm64 | api-1.1.0 | 36.5 MB | 7d84dba1645e0d9f9d1674e9ec8d4f256f72bc345d36073cd58db2e526e9799b |
| pingtower-linux-arm64.release + .sig | 29341f3f91f337ec8683a7e7cf7e36e50b1112f3e833aab0440d84282a3b9506 | ||
Verify the download
Check the Pingtower release public key
(pingtower-release.pub) first.
This site serves the binary, its signature and the key, so a tampered
site could swap all three. The key's fingerprint is also published in
the DNS TXT record _release-key.pingtower.com,
which is set apart from the site, so changing the site alone can't
change it. That record is the authority: the ssh-keygen -lf
and dig lines below must both show
SHA256:tOBYukuZW+6pJBQFDd2Hw/nWSHQa4UdLijNayRHzgrQ, and if the record
is empty or differs, stop. Then check the SHA-256 against the table
above, verify the signed provenance against the key, and make sure its
sha256= names the binary you have:
echo '[email protected] AAAAGnNrLXNzaC1lZDI1NTE5QG9wZW5zc2guY29tAAAAIBAbOs2Sr9lD/f8puNgGRxbYJPB7QVbxyar4jZfM37rKAAAADHNzaDpzaGlwc2lnbg==' > pingtower-release.pub
ssh-keygen -lf pingtower-release.pub   # the key
dig +short TXT _release-key.pingtower.com   # must match; stop if not

sha256sum pingtower-linux-amd64   # compare with the table above

printf '[email protected] namespaces="pingtower-release" %s\n' \
  "$(cut -d' ' -f1,2 pingtower-release.pub)" > allowed_signers
ssh-keygen -Y verify -f allowed_signers -I [email protected] \
  -n pingtower-release -s pingtower-linux-amd64.release.sig \
  < pingtower-linux-amd64.release

cat pingtower-linux-amd64.release   # sha256= must match the sum above
The provenance line names the artifact, version, git commit, and SHA-256 the signature was made for — every field is inside the signed file, so none can be edited after the fact. If any check fails, do not run the binary.
Set it up on a Linux server
The daemon speaks plain HTTP on localhost and expects a reverse proxy (Caddy, nginx) to terminate TLS in front of it. Data lives in PostgreSQL, or in one directory of SQLite files if you configure no database.
Install the binary
sudo install -m 0755 pingtower-linux-amd64 /usr/local/bin/pingtower
sudo useradd --system --home /var/lib/pingtower --shell /usr/sbin/nologin pingtower
sudo mkdir -p /var/lib/pingtower
sudo chown pingtower:pingtower /var/lib/pingtower
Point it at PostgreSQL
The database comes from one setting in
/var/lib/pingtower/config.yaml. Each tenant gets its own
schema. The file must not be readable by others, so the password never
leaks:
sudo install -m 0640 -o pingtower -g pingtower /dev/null /var/lib/pingtower/config.yaml
sudoedit /var/lib/pingtower/config.yaml

database:
  url: postgres://pingtower:[email protected]/pingtower
Skip this step to run on SQLite instead: with no database set, the daemon keeps everything in its data directory with nothing else to install. The install guide has the details.
Create a systemd unit
/etc/systemd/system/pingtower.service:
[Unit]
Description=pingtower
After=network-online.target
Wants=network-online.target

[Service]
Type=simple
User=pingtower
Group=pingtower
ExecStart=/usr/local/bin/pingtower \
  -listen 127.0.0.1:8391 \
  -data-dir /var/lib/pingtower
Restart=on-failure
RestartSec=2
TimeoutStopSec=20
LimitNOFILE=65536
UMask=0077
NoNewPrivileges=yes
ProtectSystem=strict
ReadWritePaths=/var/lib/pingtower
ProtectHome=yes
PrivateTmp=yes

[Install]
WantedBy=multi-user.target
sudo systemctl daemon-reload
sudo systemctl enable --now pingtower
curl -s http://127.0.0.1:8391/healthzPut TLS in front
With Caddy, one line gets you a certificate and the proxy
(/etc/caddy/Caddyfile):
alerts.example.com {
    reverse_proxy 127.0.0.1:8391
}
First account, first tenant
curl -s https://alerts.example.com/v1/signup \
  -H 'Content-Type: application/json' \
  -d '{"email":"[email protected]","password":"…"}'

curl -s https://alerts.example.com/v1/tenants \
  -H "Authorization: Bearer pts_…" \
  -H 'Content-Type: application/json' \
  -d '{"name":"Acme"}'
From there, create a source to get an ingest token and start
POSTing logs — the API reference covers the whole
data plane. Useful flags: -retain-days,
-max-logs-per-source, -backup-dir, and
-secret-key to seal integration credentials at rest
(pingtower -h lists them all).
Ring a phone
A self-hosted server does the whole inbound half — ingest, dedup,
rules, escalation, plus webhook, Slack, and Telegram delivery — on your
box. Paging a phone through the iOS app additionally needs a
pingtower.com account paired to your server
(pingtower pair --email [email protected] on a SQLite box
prints a one-shot code to redeem in the app; on PostgreSQL it points you
at the running daemon's pairing flow instead), because Apple push for the App
Store app can only be sent by us. The how it
works page and the terms spell out that
boundary.